MauiKit Controls
Introduction
MauiKit is a set of QtQuick components for building adaptable UIs based on QtQuick Controls 2.
Its goal is to enable creation of convergent applications that look and feel great on mobile as well as on desktop devices and follow the Maui Human Interface Guidelines while being easy to use.
MauiKit works on a variety of platforms, such as Plasma Mobile, Desktop Linux and Android.
Tutorial
A tutorial for getting started on creating a MauiKit application is available on our developer platform.
It is possible to make short mockups using QtQuick and MauiKit Controls and briefly test individual QML files using the qml tool. Notice that for it to work correctly you also need to export the enviroment variable QT_QUICK_CONTROLS_STYLE=QtQuick.Controls.Maui. This will make sure the Maui style is being used.
A list of additional QML learning resources is available in the Community Wiki. If you are not familiar with QML at all, the QML book should be a good head start.
If you have any questions about MauiKit, feel free to drop by the Maui Project group on Telegram as [at]mauiproject.
Components
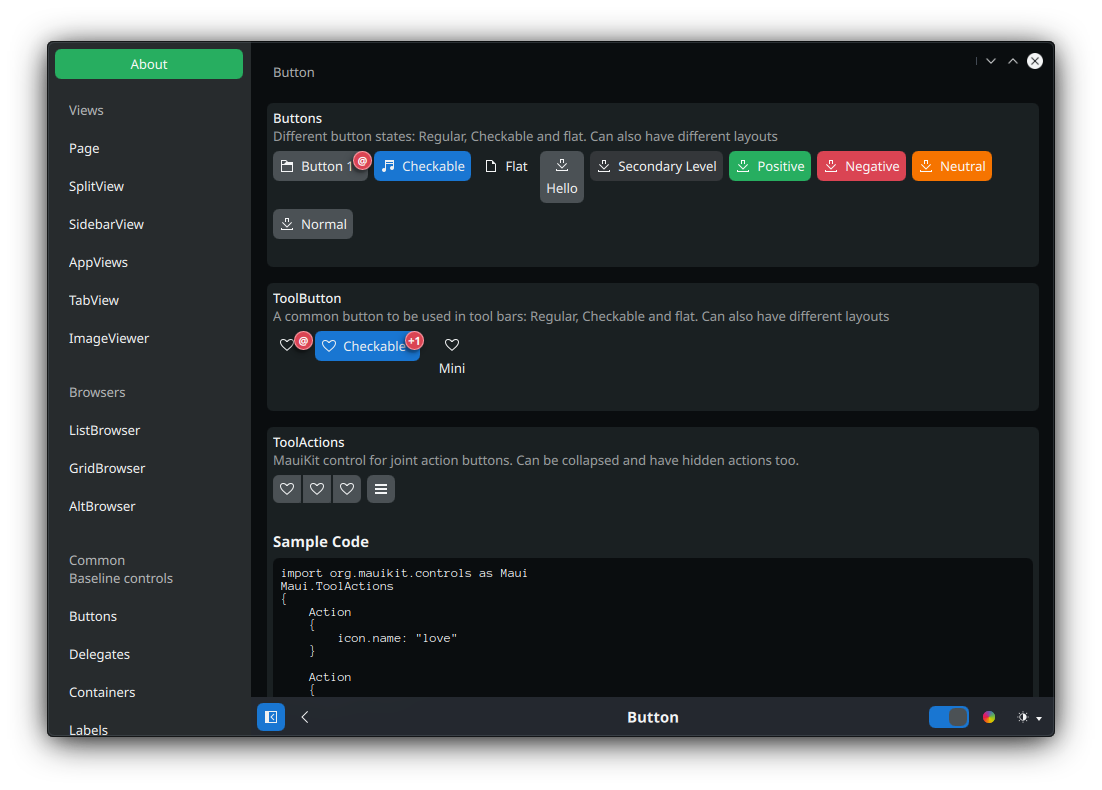
The MauiKit Controls could be divided into a few sections: there are the container views, the browsers, the delegates, and the common elements, such as buttons, cards, etc.
Main Views Components
Another views include:
Browsing Views
Delegates & Templates
Common Controls
Minimal Example
Maui Demo App
When building MauiKit source code, the building of the demo application can be enabled by setting the BUILD_DEMO flag -DBUILD_DEMO=ON.
The Maui Demo application contains most of the MauiKit controls under different use cases and also demos its features, and it is a great tool to discover MauiKit controls.
- Note
- The Maui Demo application executable is named MauiDemo4
MauiKit Style
MauiKit comes with a default style named org.mauikit.style. This style is the most -well fitted to be used with the Maui Applications, since it supports all of the MauiKit features and it is constantly tested, however, other styles can be used while they are not supported.
- See also
- MauiApp::style
Deployment
Building
For building MauiKit from source, you will need to be familiar with some basic shell commands, with a terminal emulator and your distribution package manager.
Before building MauiKit, make sure you have all the dependencies already installed with its development files.
git cmake make kf6-ki18n kf6-kcoreaddons qt6-svg qt6-base mauiman ...
Then you can clone the project to your machine.
git clone https://invent.kde.org/maui/mauikit.git
Now that you have the sources, go into the mauikit folder and start the building process.
cd mauikit
Let's build the project into a separate directory
mkdir build
Then.
cd build
An lets build it. In this example the installation prefix path is set to the /usr directory; you can modify it if you want to, but bare in mind that you will also need to let know Qt where else it can find the installed QML plugins.
cmake .. -DCMAKE_INSTALL_PREFIX=/usr -DBUILD_WITH_QT6=ON
If everything goes right, the next step is to install it on the system for it to be ready to be used.
To build the demo app, use the build flag -DBUILD_DEMO=ON
Installation
Once the project has been built from source - as explained in the previous section, you can install it.
sudo make install
This step will install the QML plugin to the right location, the Maui Style and a few other items, such as the CSD styles.
If you don't want to build it from source, you can also look for it in your distribution packages.
For example, to install it on Arch based distributions:
sudo pacman install mauikit4
Debian based distros:
sudo apt install mauikit4
Android
For Android, you will need to build it from source and install it at your Qt-for-Android root directory.
The easiest way is to build it using the Qt Creator IDE. Go to the project settings page, and enable the installation build step for CMake. That will take care of installing MauiKit into the right location. Remember you need to set the Kit to be Android. You can read more about setting up Qt from Android on their documentation website.
Usage
The simplest and recommended way to use MauiKit is to just use the packages provided by your Linux distribution, or build it as a module and deploy it together with the main application.
Once MauiKit has been installed you can start using it in your QML files by importing it import org.mauikit.controls. Checkout the ApplicationWindow for a quick example.
Examples
A group of examples for all of the QQC2 controls can be found in the source code under the examples directory.
Notes
Contributing
If you find any syntax errors, missing documentation, or not working code snippets or examples, please consider reporting the issue at MauiKit issues page, with the documentation tag.
If you want to contribute with the documentation efforts, you can contact the Maui Project at Telegram [at]mauiproject.
- Maintainer(s)
- Camilo Higuita <milo..nosp@m.h@ao.nosp@m.l.com.nosp@m..com>
Documentation copyright © 1996-2025 The KDE developers.
Generated on Fri May 2 2025 11:57:11 by doxygen 1.13.2 written by Dimitri van Heesch, © 1997-2006
KDE's Doxygen guidelines are available online.